Friday 29 November 2019

By the light of the silvery moon

Hi everyone Maria here, today I’m sharing my card I’ve named ‘By the light of the silvery moon’ and yes, I love Doris Day 😁. I used the A5 Houses stamp set from Colourific.
Here’s what I used:
A 6 card blank
Black card for mounting 
White stamping card
A5 Houses stamp set
Versafine Onyx Black
Coloured pencils
Watercolour ink brush pens (I used Spectrum Noir)
Kitchen roll
Adhesive
Double sided tape

Here’s what I did 
  1. Stamp and fussy cut out the small house, using the Versafine ink.
  2. Colour in using the coloured pencils (I drew in the curtains).
  3. Using the watercolour ink brushes, I added the blue to the top of a piece of stamping card and blended with a large flat brush and water - then I repeated with the amber colour and the green, making sure I blended the blue and amber colours for the sky but not the green.
  4. Dry this sheet using a heat gun or leave to dry naturally before you do the next step.
  5. Cut out a circle of card for the moon template - I used the top of an embossing powder lid to draw round.
  6. Place the moon template onto the sky - mainly into the blue section, and with a small wet paintbrush draw round the moon.
  7. Then with a medium sized brush wet the ink inside the circle and blot with kitchen roll - this brings the colour out of the moon giving it a faux bleached look.
  8. Glue the house onto the backing sheet.
  9. Mount onto white and then black card and then onto the card blank.

Hope you enjoy making this card.  Join me next Friday for more Colourific inspiration.
Maria x

Friday 22 November 2019

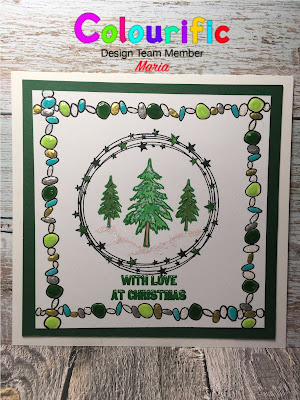
Evergreen

Hi, Maria here with my Friday post.  Today we have the Evergreen card which is made using 3 different Colourific stamp sets - Winter Wonderland, Beach Borders and A5 Rings.

Here’s what you will need-
6x6” Card Blank
5x5” White Stamping Card
5.5x5.5” Dark Green Card 
Winter Wonderland Stamp Set
Beach Border Stamps
A5 Rings Stamp Set
Black Versafine ink pad
Clear embossing powder
Tonic Nuvo Drops in Gold, Turquoise, Light Green, Dark Green, Silver
Clear sparkle Glitter Glue
Green Versafine
Watercolour paints

Here’s how I made it
  1. Using the 5.5x5.5” stamping card, stamp the Star Ring in the centre of the card using the Versafine black ink and emboss with the clear embossing powder.  Fill in the stars using green watercolour paint.
  2. Stamp a Medium Tree and two smaller trees, from the Winter Wonderland stamp set, into the middle of the Ring and colour in using the Watercolour paints.
  3. Using the green Versafine Ink, stamp and emboss the sentiment from the Winter Wonderland stamp set just under the ring.
  4. Now take the pebbles border from the border stamp set and stamp and emboss around the outside edges if the square.
  5. Using the Nuvo drops, randomly fill in the pebbles.
  6. Add some clear glitter glue to the trees and under the trees to ground them - to look like snow.
  7. Leave this to dry for a few hours to make sure all the Nuvo drops are dry.
  8. Mount onto the dark green card then adhere to the card blank.
There you go, all done, hope you like it.  Tune in next week for another card.
Maria x

Friday 15 November 2019

Celebrate your Special Day

Hello everyone, Maria here, for today’s card I’m bringing you a card using 2 sets of Colourific Stamps. I used the Celebrate Wordage stamp set and the A5 Champagne and Cocktails Stamp Set to make  this Special Day Card, but you can be more specific and make it an Anniversary/Wedding/Engagement/Birthday Card.
Here’s what you will need:

Celebrate Wordage Stamp Set
A5 Champagne and Cocktail Stamp Set
8x8 White Card blank
White Stamping card
Black card for mounting
Watercolour paints
Versafine
Distressed Oxides, peeled paint
Gold and silver Gel pens
Clear glitter glue
Double sided tape
3D Foam Pads

Here’s hope I made it.

  1. Using the black Versafine ink pad, stamp the Celebrate, Champagne bottle and two champagne flutes onto a piece of white stamping card.
  2. Colour in the bottle and the glasses using watercolour paints and fussy cut out.
  3. Colour in the word Celebrate using the silver and gold gel pens then cut this out leaving a 4cm border around the outside.
  4. To make the background, stamp the Peeled Paint Distress Oxide Stamp Pad onto a as blending mat and spritz with water.  Swish and swirl a piece of 7”x7” White Stamping Card through the ink. Dry with a heat gun and repeat the process until you reach the desired effect.
  5. Adhere the Celebrate, Champagne bottle and glasses onto the background using 3D Foam Pads.
  6. Using the ‘your Special Day’ Stamp, Ben’s and shape it on your stamping block to make the words wave, and using the black Versafine ink, stamp onto the background card.
  7. Mount onto the black card and onto the card blank.
  8. Finally, add some sparkle by adding spots of glitter glue to the Champagne Glasses and the stars around the word Celebrate.
I hope you enjoy making the card, why not try the different colour backgrounds or use your alcohol pens to colour. The main rule is, just play and have fun.

Maria x

Friday 1 November 2019

Bonfire Night

Hi everyone, November already! Where did the year go? I know it’s only the 1st of November but today I’m showing you my Bonfire Night card made using the A5 Houses set from Colourific.


Here is what you will need;
A5 Houses stamp from Colourific
Masking paper or fluid
Carnivale Colour burst powders - or Brusho powders
Black Stazon
White stamping card
Card to mount - I used Navy Blue

Here’s how to make it:


  1. Cut your white card to the size you want to make - mine is 6x6.
  2. Stamp two of the houses onto the card - you can choose any of the houses. Use black Stazon ink.
  3. Mask off the stamped houses.
  4. Lightly spritz the card with water and sprinkle the card with the Carnivale Colour Burst or brusho starting with blue at the top, then red and yellow then finally the green.  The colour will burst out when you sprinkle. You can add more water to disperse the inks until you get the desired look.
  5. Take off the masking and colour the houses with a mix of the Carnivale Colour burst or brusho inks.
  6. Leave it to dry naturally.
  7. Use a corresponding coloured card to mount up.
Hopefully you have a card resembling the vibrancy of Bonfire Night!  Now, I’m off to make some parkin and toffee apples. Enjoy!


Maria x

Friday 25 October 2019

Halloween Card Number 1

Hello everyone, today I’m adding a couple of cards using the Houses stamp set from Colourific. I’ve made a couple of super easy cards and given them a little bit of a spooky look for Halloween.  Here is the first one and you can make it any size you want. Mine is a small A6 card.


Here’s what you will need:
Black card base
Black card stock
Orange card stock
Versamark
Gold embossing powder
Distress Oxide - weathered wood

Here is what I did:
  1. Take a piece of black card and stamp a house in Versamark then emboss with an antique gold embossing powder.
  2. Stamp the Weathered Wood Distress Oxide on your stamping mat and spritz with water.
  3. Swish the card through it a couple of times and let it dry naturally.
  4. Mount onto the orange card stock then mount onto the black card blank.
Easy and simple - you can embellish with ghosts, ghouls and pumpkins etc if you like but I wanted it desolated.

Keep an eye open later today for my second card

Maria x

Friday 18 October 2019

Rings and borders

Happy Friday everyone, what a busy week! I hope you have enjoyed looking at all the cards in the new launch from Colourific.  In today’s card I have used stamps from the Beach Border and the A5 Rings stamp sets.


Here is what you will need:

Dark red square card base
Dark red card
White Stamping Card
A5 Rings Stamp Set
Beach Borders Stamp Set
Versamark
Gold Detail Embossing Powder
Gold Nuvo Drops
Onyx Black Versafine
Clear Embossing Powder
3D Foam Pads
Watercolour Pencils
Squeezed Lemonade Distress Ink
Iridescent Glitter Glue

Here’s how to make the card:

  1. Firstly, stamp the star ring using Black Versafine and Clear Embossing Powder.
  2. Stamp and emboss the candle from the Rings set using the same ink and powder.
  3. Colour the candle and the stars using watercolour pencils.  When dry, lightly blend a little of the Squeezed Lemonade ink over the area where the flame is to give it a yellow glow.
  4. I then decorated the mat layers with the zigzag and dots border around the four sides of the dark red smaller square and the larger white square, crossing the lines at the corner.  For the borders I stamped with Versamark and Gold Detail Embossing Powder.
  5. On a separate piece of card, I stamped 4 baubles in Versamark and gold embossed them.  I coloured these in with watercolour pencils.
  6. Cut out the ring leaving a 4 mm border and fussy cut the four baubles.
  7. Mount the ring in the middle of the red square using 3D foam pads.
  8. Mount the red square onto the white square and the white square into the red card base using glue or double sided tape.
  9. Finally fix the 4 baubles on the four corners of the white square using 3D Foam pads, add a gold Nuvo drop to the corners of the red square and add a touch of glitter glue to the baubles and candle flame.
Watch out for tomorrow’s card!


Thursday 17 October 2019

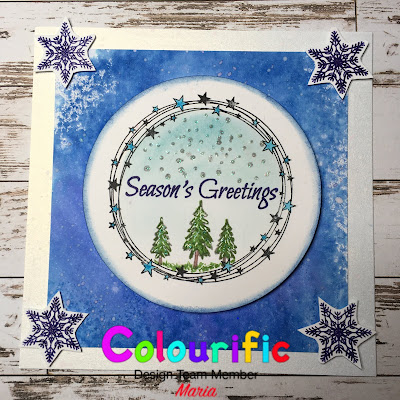
Winter scene in a ring

Here’s another card showing you one of the new stamp sets from Colourific.

Here’s what you will need:
A5 Rings stamp set
Winter Wonderland Stamp Set
Distress Inks - any blue - I used Salty Ocean
Watercolour paints or pencils
Clear Embossing Powder
Versafine Onyx Black
Versafine Clare blue
White and blue Gel Pens
Iridescent Glitter Glue
3D Foam pads
6x6” card base
Stamping card
Die cutter - circles or punch

Here’s how I made it;

  1. Cut a piece of 5x5” stamping card.  Stamp the Distress ink onto a blending mat and spritz with water, swish the card through the ink and dry.
  2. On a separate piece of card, stamp the stars ring in black Versafine.  Cut out a circle around this stamp - I used a die cutter or thus or you could use a punch. 
  3. Stamp two small trees, one medium tree and seasons greetings in the circle and colour with watercolour paints or pencils. Add a blue wash for the sky and draw in some grass under the trees.
  4. Stamp some of the small dots for snow and glitter the top of the dots.
  5. Stamp and emboss 4 snowflakes onto a separate piece of card and cut out.
  6. With the white gel pen, colour in some snow on the trees and with the blue gel pen colour in the stars of the ring.
  7. Mat the blue inked background onto the card base and adhere the circle to the middle of the card using 3D Foam pads.
  8. Add the snowflakes to the corners of the blue background using 3D Foam Pads.
Hope you enjoy making this card - the rings are very versatile and can be used as a frame for lots of small stamps and dies.


Maria x

Wednesday 16 October 2019

Love you forever

For that special someone in your life - try this quick and simple card.  I’ve used the Love Wordage stamp set, with hearts from the A5 Houses stamps these are all available from Colourific.

Here’s what you will need

Love Wordage Stamp set
A5 Houses Stamp set
A5 Cerise Card Blank and A4 card for mounting
White Stamping Card
Distress Oxides Picked Raspberry and Iced Spruce
Versafine Onyx Black
Clear Embossing Powder
Pink Gel pen
Iridescent Glitter Glue
Blending mat
Adhesives

Here’s how I made the card;


  1. Stamp the distress Oxides onto the stamping blending mat and spritz with water.  Take a sheet of A5 stamping card and swish through the ink. Dry ink and swish again until you are happy with the effect.
  2. Using the same colours stamp the heart stamp from the houses stamp set randomly across the sheet.
  3. On a separate piece of card stamp the Love stamp using the versafine ink pad - emboss this with the clear embossing powder.
  4. Colour this in with a pink gel pen.
  5. Stamp the ‘you forever’ stamps in a smaller rectangle.
  6. Mat the words onto cerise card and adhere to the background sheet.
  7. Adhere the background sheet to the cerise card blank
Hope you enjoy making this project.
Maria x

Tuesday 15 October 2019

Celebrate Wordage on Amber and Coral

Everyone needs some word stamps and these from Colourific are just what you need.  You don’t even need a picture on these cards as this next one shows.
Here’s what you will need:

A5 Dark Red Card Blank
White Stamping Card
Black card for mounting
Distress Oxide inks - Abandoned Coral and Fossilized Amber
Blending mat or glass mat
Red Harmony Ink pad
Red and yellow fineliner
Onyx Black Versafine
Peach and yellow Nuvo drops
Gold gilding wax

Here’s how I made it:

  1. Stamp the Distress Oxides onto the stamping mat, spritz with water and swish the stamping card through the ink. Dry the ink off and repeat until you are happy with your background.
  2. Make sure the ink is completely dry before you stamp the Celebrate stamp onto the middle if the card in the red harmony ink. Colour in the gaps of the word with the red fineliner and the flourish and the stars in the yellow fineliner - see picture.
  3. Stamp the Congratulations and your special occasion in black versafine.
  4. Distress the edges with the Gilding wax.
  5. Mount onto black card, then into the dark red card blank.
  6. Distress the edges if the card blank with gold gilding wax - I use Pebeo gilding wax.
  7. Finish off by adding co-ordinating Nuvo drops in the corners of the dark red card and the inky background.
This is a stunning card which doesn't show up well in the photograph - messy and fun to do. Just remember to make sure all the inks are dry before moving to the next stage.

See you soon for the next tutorial
Maria x

Congratulations on your new home

Here’s another of my cards from the new launch of stamps from Colourific . This time I’ve used the A5 Houses stamps. These lovely stamps come in a pack with lots of accessory stamps to decorate your homes and gardens.
Here’s whst you will need:

A5 Houses stamp set
White Stamping Card
Cream Card for mounting
Base card - I used a Brown 6” square card
Versafine Onyx Black
Watercolour paints
Distress Ink, Brushed Corduroy
Iridescent Glitter Glue
Gold Nuvo Drops

Here’s how I made it.


  1. Stamp the two houses into a piece of 5x5” stamping card using Versafine.
  2. Stamp the fence at either side of the Houses, then add the fir trees in the garden.
  3. Stamp one of the houses with the garland swag.
  4. Using a really fine paintbrush, paint the houses, fence and fir trees in watercolour.
  5. Using a wider brush, paint the sky and grass.
  6. Blend the Distress ink around the edges.
  7. Stamp Congratulations in Black Versafine onto the grass bottom right.
  8. Mount onto the Cream Card (5.5x5.5”), then onto the card blank.
  9. Finish off by adding a touch of glitter glue to the windows and add 3 Gold Nuvo Drops to the top right and bottom left corners.  Let this dry.
That’s your card completed.

Reindeer in the Ring of Lights

Hi everybody, here is the Reindeer in the ring of lights card I made for the new stamps launch.
I used the A5 Rings and the Winter Wonderland stamp sets from Colourific.
Here’s what you will need:

A5 Rings Stamps
Winter Wonderland Stamps
Versafine
Clear Embossing Powder
Watercolour Pencils
Multicoloured Fineliners
Distressed Oxides - Peeled Paint
White Stamping card
Black Card
White card blank (I used 7x7”)
Glossy Accents

Here’s how I made it

  1. Stamp the ring of lights in the centre of the stamping card (6x6”) using black Versafine and clear embossing powder.
  2. Stamp the deer and fawn in the centre of the ring and emboss. 
  3. Colour the main deer image in with Watercolour Pencils and the lights on the ring in felt tip pens (I used fineliners).
  4. Draw in some green grass under the Reindeer so that they aren’t floating!
  5. Using the Distress Oxide, blend all round the edge then sprinkle (flick) water on the ink - then blot with kitchen roll to give the white marks.
  6. Mount onto black card (6.5x6.5”) then onto the card blank.
  7. Use Glossy Accents on the fairy lights to make them shine - then let it dry.
  8. Add the sentiments using the black versafine and clear embossing powder, mat and layer onto black card and add to the finished card.
All done - obviously you can play around with images in the rings and change the border colours - have a play.

See ya later!

Friday 4 October 2019

Rainbow Hibiscus

Hi everyone, Maria here, hope you are all well.  Today I have the Rainbow Hibiscus card for you.  Made using the Hibiscus Stamp by Colourific.
Here’s what you will need:
A5 Hibiscus Stamp from Colourific
Versamark ink pad
White Embossing Powder
Multicoloured die inks - I used Catherine Pooler minis Life if the Party set
Nuvo drops - multicoloured
White Stamping Card
7x7” white card blank
3D Foam Pads
Coloured Card for mounting - I used pastel pink and blue
Sentiment stamp - I used Thanks from my stash.

To make the card:

  1. Take a square of white stamping card for the main background (I used 6” x6”), and blend the coloured die inks in stripes diagonal lines across the card.
  2. Randomly stamp the stamens, flourishes and blooms using the Versamark and emboss using the white embossing powder.
  3. Using the green ink pad, stamp the small stamen randomly on this backing paper.
  4. On a separate piece of stamping card, stamp different sizes of the blooms in different colours and cut out leaving a small white border.
  5. Using the same colour Nuvo Drops as the blooms, work your way around the outside of each bloom making small dots. Do this to all the cut out blooms.  Leave these to air dry.
  6. Mount up the backing paper onto the pink and blue card and stick these onto a 7x7” card blank.
  7. Add 3 yellow Nuvo Drops to each of the corners in the white card base and leave to dry.
  8. Stamp a sentiment, I used Thanks from my stash, and mount using 3D foam pads.
  9. Finally, once the Nuvo drops are set, attach the blooms to the card using 3D foam pads.
Voila, all done.  Hope you like it. See you next week with another new card.

Friday 27 September 2019

Deer in a snow globe

Hi everyone, Maria here with another idea for a card using the Winter Wonderland stamp set from Colourific.
Here's what you will need:

A5 Winter Wonderland stamp set
1 sheet red card
1 sheet stamping card
Silver mirror card
Snow globe and circle cutting die
Versafine Onyx Black
Clear Glitter Glue
Water colour paints
Gold Gilding Wax
Paper mask or liquid masking fluid
Water colour paints

Here's How I made it:
1. Die cut 3 Snow Globes in Dark Red card and one in stamping card
2. Die cut 1 circle in the middle of one of the red globes and one in white stamping card.
3. Stamp the image of the reindeer in the centre of the white stamping card circle and mask the reindeer.
4. Watercolour the blue sky, then remove the mask and paint the reindeer.
5. On a separate piece of stamping card, stamp a few of the medium and small Christmas Trees, water colour them in and fussy cut them out.
6. Glue the trees onto the circle and draw in some snow hills using the clear Glitter Glue.  Add some glitter to the trees and dot the sky to give snow.
7. Once dry, stick this circle to one of the red complete snow globes.
8. Add mirror card behind the base of the globe with the cut out circle, then apply the gold Gilding Wax to almost cover the red card.
9. Glue this frame onto the top of the globe with the topper on.
10. On the third snow globe, make a fold 1 cm from the top of the globe and attach this base to the decorated globe by gluing the 1cm at the top of the globe.  This will enable the globe to stand up like a card.

That's it, all done


Gatefold Winter Wonderland

Hi everybody, 
Today I've used the Winter Wonderland stamp set from Colourific to make this lovely gatefold card.
To make this card you will need:
A4 White card
A5 Winter Wonderland Stamp set
Co-ordinating winter backing paper
Die cuts of Reindeer and snowflakes
Distress Oxides for colouring
White Pen
Grey Alcohol pen
Versafine Smokey Grey ink pad
Catherine Pooler Aquatini ink pad
Tacky Glue
Green Sparkly paper/glitter card
Frame Die
Gelly Roll sparkle pen
Black Fineliner

This is how I made it:
1.  Cut a White card base 294mm x 150mm - to make gatefold, score at 73mm and 220mm.
2.  Cut a piece of stamping card 92mm x 135mm and stamp the deer onto the card, then make a mask and cover the image.
3.  Using a blue Distress Oxide ink pad, gently blend the top of the card to show blue sky, fade out towards the bottom 1/4.
4.  Stamp the bare trees using the grey Versafine in the two different sizes and with a grey alcohol pen draw shadows under the trees.
5. Remove the mask from the deer and colour using the different colours of Distress Oxides.  I used a Gelly Roll sparkle pen for the antlers and a fineliner for the nose.  I then coloured the trees and added white pen to highlight areas of the trees.
6.  Blend around the outside of the topper with the Aquatini ink pad.
7.  Cut a piece of the green sparkle paper to 100mm x 143mm and mount the topper onto this.
8.  To make the shaped card base, I folded along the fold marks to make the gatefold shape, I slipped the frame die in the middle, cut side up so that it cuts the front two flaps, then put it through the die cutter.

Friday 13 September 2019

Forest in Winter

Hi everybody, Maria here.  Today I'm going to show you how to make the Forest in Winter card using the A5 Winter Wonderland Stamp from Colourific.
To make this card you will need:
A5 Winter Wonderland Stamp Set
A5 Blank white card base
A5 Dark Green card
A5 sheets of white card
Onyx Black and Smokey Grey Versafine ink pads
Water colour Pencils
Clear Embossing powder
Gelly Roll Clear Star pen
Distress Oxides - Peeled Paint, Cracked Pistachio and Iced Spruce
Mardi Gras Carnivale Colourburst
Double Sided Tape
3D Glue Gel

This is how I made it:
1. Trim the A5 white card and the dark green card by 1 cm top and bottom so that it fits within the card base leaving a nice border.

2.  To make the background, stamp the three Distress Oxides into a blending mat and spritz with water, swoosh one of the white cards into it and keep doing this until you are happy with the result.  It is good to dry off the card in between the swooshes - you get some lovely effects. After you have done the last swoosh, before drying sprinkle on some of the Mardi Gras Colourburst into the wet ink and give it a spritz with water to make the colour burst.

3.  Let this dry, once dry, stamp the small forest trees randomly all over the sheet.

4.  Take the other sheet of cropped white card a cut 2 diagonal lines from the bottom left corner to either side of the top right corner in a V shape - see card.

5.  Stick this to the green card matching up the sides so that all you can see is the dark green V in the middle.  Trim the green card to 2 mm border of the inside of the white card.  See card. This gives the inside a border.

6.  Stick both these corners to the background sheet you just made, matching up the corners to give you the colourful inset.

7.  Stamp the small dots stamp all over the white triangles in grey Versafine.

8.  Stamp the Winter Wonderland stamp on the edge of the right hand triangle and emboss with clear embossing powder.

9.  Stick this to the A5 card base.

10.  On a separate piece of white card stamp 2 of the large trees and 4 of the medium trees using the black Versafine.  Colour these in - I used watercolour pencils.

11.  Cut out the trees leaving a small white border.  I then used the gelly pen to glitter the snow on the trees.

12.  Arrange the two large trees and attach using 3D glue gel to the bottom left so that it covers the bottom end of the colourful insert, add the other medium tree to the bottom right.

That's it, all done - how I wish I had photographed this one as I made it - it's so hard to explain without pictures.  If you are stuck or struggling to understand please ask and I'll try and explain.  Next time I make another one like this I will do the pictorial step by step.

Bye for now
Maria x


Friday 6 September 2019

Blue Hibiscus Bunch

Hi everybody, its Maria here with my Friday Colourific post.

Today we have the A5 Hibiscus stamp which is available from the Colourific website for only £12.99, Which I have coloured in blues and greens.
Here's what you will need:

A5 Hibiscus stamp set
Blues/Greens/Yellows - spray inks (I used Pearlywinks vibes)
Light Blue/Dark Blue/Green ink pads - I used Harmony ink pads
White Stamping card
Embossing folder (I used a Crafters Companion Sheena one)
White card blank 8 x 8"
Black card for mounting
3D Foam Pads
3D Glue gel
Pokey tool
Blu tac
Silver Ribbon
Brads
Tacky Glue

Here's how to make the card
  1. Emboss a piece of white card 7.5 x 7.5" square and glue to the centre of the 8x8 card blank.
  2. Stamp out three of the large blooms in a light blue ink onto the Stamping Card - cut out leaving a small border.
  3. Stamp out 3 medium sized blooms in green ink onto the Stamping Card - cut out leaving a small border.
  4. Stamp out 3 small sized blooms in dark blue ink onto the Stamping Card - cut out leaving a small border.
  5. Spray the Blue/Green/Yellow inks onto a blending mat and spritz with a little water - then swoosh a piece of stamping card approx. 5.5 x 5.5" into the inks and swirl it around.
  6. Once dried, lightly spritz the same colours over the backing sheet to leave the speckles.  Leave this to dry naturally if possible.
  7. Layer up the blooms and place on a ball of blu tac - then push your pokey tool through the middle for your brad to fit through.
  8. Put one of the brads through the hole in each of the flower heads.
  9. Using the large stamen stamp, stamp four stems as per the photo.
  10. Attach 3D foam pads to the flower heads and place them on the top of the stems.
  11. Mount the topper onto a piece of slightly larger black card, then mount this onto the embossed card on the card blank.
  12. Finally, add a silver ribbon bow using 3D glue gel.
Hope you enjoy making your card, watch out for more next week.

Tuesday 3 September 2019

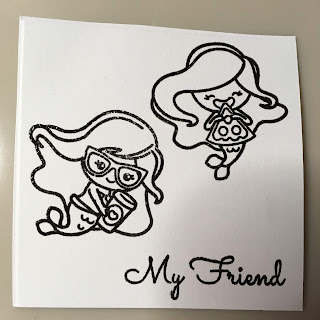
Mermaid Friends

Morning everybody,

This morning, I have been having a play with my new stamps from Penguin Palace - this time I've used the Mermaid set - Take a Break.  All stamps and inkpads are available from The Little Paper Tree - don't forget to put my discount code mariapapertree  for 10% off at the checkout.


Here is what you will need to make this card:

Take a Break Stamp set from Penguin Palace
A6 Blank Card base
Stamping Card
Blue Vellum or Parchment
Circle cutter or die 3.25"
Catherine Pooler Minis ink sets - Carnivale and Live of the Party
Versafine Black Onyx
Clear Embossing Powder
Green fineliner
3D Glue Gel or Foam Pads
Water Brush
Picket Fence Blending Brushes

Here is how I made it
  1. Stamp the two Mermaids and the sentiment onto a piece of scrap stamping card using the Black Versafine. 
2.  Emboss these images using a Clear Embossing Powder.

3. Using the Catherine Pooler Minis inks and a waterbrush colour in parts of the Mermaids. These inks blend beautifully together.

          4.  Leave the skin clear, we will  come back to that later.  To use up the ink on your mat, spritz with water and place a piece of stamping card on top and give it a swish.

         5.  Leave to dry.  This gives you a lovely background.

        6.  Using the following colours mixed together, paint the skin.

      7. Cut out the images using a 2mm border.

       8.  Using the green fineliner, draw a couple of squiggly borders around the My Friend Sentiment.

       9.  Cut a circle using a 3.25" punch or die out of Blue Vellum or Parchment and blend the edges with your Blending Brushes and the Something Borrowed Catherine Pooler Minis - also 
            blend round the My Friend sentiment.

       10.  Using the following three colours, alternatively dab two strips of stamping card to make borders.  I then spritzed these with water to help them blend together.

        11.  Attach the background paper to the A6 Blank Card base, then attach the circle and mermaids using 3D glue gel.  Only glue behind the mermaids.  Then with the lips stamp, stamp some lips randomly on the background paper.
      
12.  Attach the 2 border strips to the ends of the card and with 3D glue gel, add the sentiment.

That's it …. all done!

See you next time
Maria


Friday 30 August 2019

A Nod to Andy

Hello everybody, it's Maria here and for today's post I have been influenced by the style of Andy Warhol in making a picture made from the Campervan stamp set from Colourific.


To make this 8x8" picture you will need:
Colourific Campervan Stamp set
Stamping white card
Masking paper or fluid
Clear Embossing Powder
Coloured ink pads
(I used Spectrum Noir Harmony ink pads in Lemon Tonic, Ocean Blue, Grasshopper and Fushia)
Versa Fine Onyx ink pad
Silver gel pen
Paintbrush
Brayer and Gelli plate or just blend the colour with a blending brush or sponge
Double sided tape.

Here is how I made it:
  1. Firstly cut four pieces of stamping card cut to 4" x 4" and stamp the Campervan image in the centre of each of the cards.
  2. Emboss these with clear embossing powder.
  3. Mask off the windscreen and the lights with masking paper or masking fluid and let it dry.
  4. Colour each of the full cards with the inks. (I used a brayer and Gelli plate)
  5. If you want to add texture to the inks, add a splash of water and dry with heat gun.
  6. Take off the masking paper or rub off the gum and colour with the inks in a corresponding colour.
  7. Using a paint brush add more of the same colour to the flowers of the campervan to make them stand out more.
  8. Once dry, attach double sided tape to the back of each of the cards and stick them to a piece of 8" x 8" card.
  9. Frame - I bought this one for a pound in the Poundshop.
There you go, all done.  This makes a great picture for a teenagers bedroom wall, or wherever you want really.

Bye for now
Maria

Tuesday 27 August 2019

Penguin Agenda 3


Hi everybody

Here is the last of my three cards for today, using the Penguin Palace Penguin Agenda stamp set which is one of the new stamps from The Little Paper Tree.  Use my new code for 10% discount at the checkout
                             *******                       mariapapertree                        ********


To make this card this is what you will need:

White Card cut to size A6
White stamping card
Make a Wish sentiment from my stash - you can add any of yours
Clear embossing powder
Alcohol Inks
3D foam pads
Clear glitter glue

How I did it
  1. To make the background I used the Peacock Mandala stencil from Picket Fence Studios and place it halfway onto the right side of the card blank, I chose the Aquatini coloured ink pad out of the Catherine Pooler minis ink set and blended the ink through the stencil using the PFS Blending Brushes.
  2. Then choose three different penguins from the Penguin Agenda set and stamp and emboss onto  a separate piece of white stamping card.
  3. I used my alcohol pens to colour in the images, then cut out leaving a small white border.
  4. Attach the three penguins in a line on the bottom of the card using 3D Foam Pads.
  5. To finish off the card, I added a highlights to the penguins using a clear glitter glue and stamped a sentiment out of my stash to the top left of the card - I used Versafine and clear embossing powder to make it shine.
I hope you have enjoyed making these cards - they are lovely and simple to make but they look so effective.

See ya later
Maria


Penguin Agenda 2

Hi everybody

Here is the second card for today, using the Penguin Palace Penguin Agenda stamp set which is one of the new stamps from The Little Paper Tree.  Use my new code for 10% discount at the checkout
                             *******                       mariapapertree                        ********


To make this card this is what you will need:

White Card cut to size A6
White stamping card
Clear embossing powder
Alcohol Inks
Circle die cuts in two different sizes to mat and layer
Pink glitter card
Happy Birthday stamp from my stash
3D foam pads
Clear glitter glue

How I did it
  1. I chose the Party Dress coloured ink pad out of the Catherine Pooler minis ink set and blended the top and the bottom of the card blank.  I made the colour more intense on the outside of the card and blending into nothing.
  2. I cut a circle with one of my die cuts in my stash onto white stamping card and stamped the penguin wearing the party hat in the middle of the circle in black versafine and embossed in clear embossing ink to give it a shine.
  3. Colour the image in using alcohol pens and don't forget to ground the penguin by colouring in a patch under his feet - now he doesn't look like he is floating.
  4. Using the Party Dress ink, blend around the outside of the circle to frame the penguin.
  5. Cut out a larger circle in a pink glitter card and mount the penguin circle onto this using 3D foam pads.
  6. Attach this to the top half of the card blank leaving space underneath where you can stamp your sentiment - use black versafine and emboss this with your embossing powder.
  7. Then choose four different penguins from the set and stamp and emboss onto  a separate piece of white stamping card.
  8. I used my alcohol pens to colour in the images, then cut out leaving a small white border.
  9. Attach the four penguins in a line on the bottom of the card.
  10. To finish off the card, I added a highlights to the hat, balloons, presents and camera using a clear glitter glue. 
Watch out for the next one - coming soon.


Penguin Agenda 1

Hi everybody

OK, so I got some new stamps from The Little Paper Tree and I can't put them down, so today I've done 3 different cards for you,  This is the first - Penguin Agenda 1 using the Penguin Palace - Penguin Agenda stamp set which is one of the new stamp sets from The Little Paper tree.  Use my discount code 'mariapapertree' for 10% discount at the checkout.
 
It's only small but it's so cute.
 
This is what you will need:
 
White Card cut to size 4"x4"
White stamping card
Clear embossing powder
Watercolour Paints
Circle die cut
3D foam pads
Clear glitter glue
 
How I did it
  1. I chose the Party Dress coloured ink pad out of the Catherine Pooler minis ink set and blended a circular shape in the middle of the square card.  I made the colour more intense in the middle and blending out to nothing.
  2. I cut a circle with one of my die cuts in my stash and stamped the castle just to the right of the middle in black versafine then embossed with a clear embossing powder.   
  3. I then stamped and embossed and cut out leaving a small white border the winking penguin and an ice cream on a separate piece of white stamping card.
  4. I used my watercolour paints to colour in the images and painted in a green hill underneath the castle.
  5. The penguin was attached to the  circle using 3D foam pads, then the circle was attached to the centre of the blended pink on the card blank.  Make sure you can see the pink coming out from under the circle - if you can't add more ink to your card blank.
  6. To finish off the card, I added a highlight to the castle windows, flags and the ice cream using a clear glitter glue.  Then add the 'Love ya' stamp from the Picket Fence Studios Part of the Pack stamp set.
Watch out for the next one - coming soon.


Friday 23 August 2019

Hibiscus on Vellum

Hi everybody, Maria here!

It's Friday so its my turn to show you what I have made this week.  I love the black and white look with a hint of metallic , so I tried the hibiscus stamp from Colourific on vellum with gold and silver pixie powders.


To make this card you will need:

A5 Hibiscus stamp from Colourific
Sheet of white vellum
Onyx Black Versafine ink
Mirror Card in Gold and Silver
Grey Pearl card
Small piece of black card
Versamark
White Card Blank
4 x Brads
Black Card
Gold Embossing ink
Sentiment out of stash
Gold and Silver Pixie Powders
Water Spritzer
Heat Tool
3D foam pads
Double Sided sticky tape


Here is how to make it:
  1. Sprinkle the gold and silver pixie powder onto a piece of white vellum 13.5cm square.  Spritz the powder with water and either let it dry on its own or use a heat gun.  nb.  The vellum will crinkle more with the heat gun - but this all adds to the texture.
  2. Stamp the flower head, the small stem and flourishes randomly on the vellum using the versafine ink.
  3. Lightly spritz the vellum with Pure Pearl Mist ink spray from Pearlywinks and leave to dry.  I want to give it a textured look so don't worry if it starts to crinkle - that's how I want it too look.
  4. Attach this to the mirror card which is cut to exactly the same size by using brads.
  5. Mount this onto a piece of pearl grey card and then onto the 6x6" card base.
  6. Stamp the sentiment onto a piece of black card by using Versamark and emboss in Gold embossing powder.
  7. Cut into the shape of a banner and mount onto gold mirror card.
  8. Attach the banner to the card using 3D foam pads

Tuesday 20 August 2019

Four legs and fur

For todays card, I have made a cute little A6 card using the Part of the Pack stamp by Picket Fence Studios which is ideal for all us dog lovers.  This stamp is available from The Little Paper Tree Shop.

To make this card you will need:

A6 card blank - I used one with a ready made aperture
Circle die cut or large circle punch (if you don't have an aperture card)
White Stamping card
Part of the Pack stamp from Picket Fence Studios
Black Fineliner
Sticky tape
Versafine
Spare card from stash
Tacky Glue
Versamark
Clear embossing powder
3D Foam Pads

To make the card
  1. Stamp the full image onto stamping card and colour in using the Nuvo Markers.
  2. Make your aperture card (mine is 3" diameter hole)
  3. Stamp out some of the Catherine Pooler inks onto your mat and spritz with water.  Splash this onto your card to give a multicoloured spotted effect. 
  4. Cut out the coloured in dogs and place behind the hole. 
  5. Trim off dogs not needed, but do not throw away.  Cut out one of the dogs to sit on its own on the front of the card, cover with Versamark and clear emboss to make it shine.
  6. Using some spare card from your stash, stick this behind the dogs as a background.  Make sure the dogs are well and truly stuck down - I used Sticky tape.  
  7. Glue a spare piece of card behind the dogs to tidy the inside of the card.
  8. With the Versafine pad, stamp and emboss the sentiment onto the bottom left hand side of the card.
  9. Attach the glossy dog using 3D foam pads.
  10. Finally, using a fineliner black pen, draw dashes around the aperture.
All done, hope you have a go at this one, it's so cute.  You will find the materials at The Little Paper Tree Shop and don't forget to use my discount code gail10 for 10% discount.

Have fun and keep an eye on my blog for more ideas in the future.

Maria x


Friday 16 August 2019

Christmas Deer

Hi everyone, Maria here.  It's Friday which means it's my turn to spread a little Christmas Cheer this week with a card using the Winter Wonderland stamp from Colourific.

I know it's only August but now is the time of year that some of us crafty folk start thinking of Christmas cards.  With that in mind, I have made a start with this card featuring the Christmas Deer and fawn from the Winter Wonderland stamp set from Colourific.


Here is what you will need:

5x5" card base
White stamping card
Brushed Silver card
Blue card
Versamark black inkpad
Clear or White Glitter - I used Nuvo 
Glue pen
Watercolour paints
3d Foam pads
Doublesided Sticky Tape
White gel pen

Here's what I did:

  1. I stamped the image of the deer and fawn on a piece of 3.75 x 3.75" stamping card and placed 4 of the small trees around them.  I also stamped the snow drops in the sky area.
  2. Coloured the images and the sky using watercolour paint.
  3. Using a glue pen I drew the lines where the snow starts/ends, the snow drops, the edges of the tree where the snow would collect and grounded the trees and deer, I then glittered these lines.
  4. I highlighted areas with the white gel pen.
  5. This was then mounted up onto the silver card then the blue card.
  6. Finally, I stamped and glittered the With Love At Christmas sentiment and used a foam pad to adhere it to finish the card.

Hope you enjoy making the card, I'm off to create another one.

See ya later
Maria x

Doxies Party

Here’s Doxies Party card made from the new stamp sets from Catherine Pooler Designs made for The Little Paper Tree Instahop. Stamped in the ...