Sunday 1 March 2020

New home

Hi everyone, as promised here is the new home card I made this week.  I used the A6 Houses Stamp set from Colourific and used the masking technique to layer up the houses.


Here’s what you will need

White, yellow and turquoise card
7x7” card base
A5 Houses Stamp set
Versafine black ink pad
Colouring pencils - mine are Spectrum Noir
Sticky notes
Double sided tape or glue

Here’s how I made the card.

1.  Cut a piece of white card to 5.5 x 5.5”

2. Stamp 3 of the small houses using black Versafine.


3.  Stamp the house onto 4 pieces of sticky notes, making sure your stamp covers the sticky edge.

4.  Cut out all the sticky note houses.

5.  Cover the three houses on the white card with the sticky notes.

6.  Stamp the house again over the top of the sticky notes as shown in the picture.


7.  Peel off the sticky notes and use them again to cover the houses you have just stamped.

8.  Continue covering with notes and stamping until you completely fill the sheet.

9.  Colour in the houses - I used colour pencils but you can use whatever you want.

10.  Finally mount to onto the coloured card and the card base. 

11.  Add a sentiment to the bottom right corner if you wish.

I hope this is clear and you can understand what I’ve done - if not, just leave me a message in the corner and I’ll try and help you out.

Bye for now 

Maria x

Monday 24 February 2020

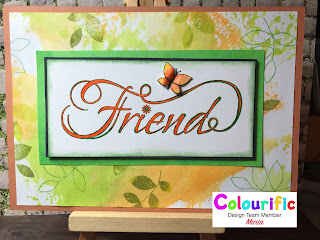
Friend

Hello everyone, Maria here with my step by step instructions on how I made the Friend card below

Here’s what you will need:

White stamping card
A5 Light Brown/tan card blank base
Black Card
Green card
Friend Wordage stamp by Colourific
A6 Leaves Stamp set by Coloyrific
Green Versafine Clare
lime green, sage green and light orange ink pads - I used Catherine Pooler Minis)
Glue/Double sided tape
Yellow and Orange Fineliners

Here’s how I made the card:

1.  Stamp the light orange and lime green ink pads onto a glass Matt or blending Matt, spritz with water and swoop the white stamping card through it until you get the desired effect.
2.  Dry the background sheet with a heat gun.
3.  Randomly stamp the leaves onto the background using the sage green ink pad.
4.  Using the green Versafine Clare inkpad, Stamp the word Friend onto a piece of white stamping card.  Cut down the card to frame the word.
5.  Colour the inside of the word Friend using the orange fineliner.
6.  Ink around the outside of the card using the lime green inkpad.
7.  Mat and layer into the black and green card.
8.  Mount the background sheet onto the tan card base and mount the topper into the background, cantering in the middle.
9.  Stamp the butterfly onto a separate piece of card and colour using the fineliners.
10.  Bend back the wings and glue the middle of the butterfly above the ‘e & n’ of the word friend.

Hope you enjoy making your card and that your friend likes it too.  Keep your eyes on the blog for more ideas and inspiration using the Colourific stamp sets. 
Mariax


Friday 14 February 2020

My heart belongs to Sapphire

Happy Valentines Day everyone. To celebrate this lovely day I’ve used one of my favourite stamps to send you all a bit of love.  Here is The Zen Lady Sapphire 


Here’s what you will need
A4 sheets pink card
A4 sheet stamping or watercolour card
Zen Lady - Sapphire 
Love Wordage Stamp set
A6 String of Hearts stamp set
Watercolour paints
Black Versafine Clare
Black fine liner
White gesso
Distress Oxides. Barn Door
Distress Oxides Tattered Rose
Distress Oxides Abandoned Coral
Bordeaux Harmony ink
White Gel pen
Blue Zig brush pen
Glue
Ribbon

Here’s how I made it

1.  I cut two hearts on my Scan n Cut 200x200mm in pink card and glued them together to make a stronger card base.
2.  Stamp Sapphire onto a sheet of white card using the Versafine. 
3.  Colour the image using your preferred media - I used watercolours.
4.  To give her blue eyes, I added white gesso to the outer rim of the black eyes and once dried I coloured them with the blue zig brush pen.
5.  Cut out the main image.
6.  Take the three distressed oxides and press onto a glass mat.  Spritz with water and swish the heart through it until you have the desired effect.  Drying in between layers with a heat gun.
7.  Using the small solid heart out of the String of Hearts stamp set and the Bordeaux ink pad, stamp around the outside edge of the heart.
8.  Glue the cut out Sapphire onto the heart leaving part of it hanging off the edge - cut this off flush to the heart once it’s dry.
9.  Stamp the Love Word onto the heart using the black Versafine, then colour in using a black felt tip pen or fine liner.
10.  Stamp ‘has no limits’ underneath in black Versafine.
11. Accentuate the Love using a white gel pen and make the eyes twinkle by putting white gel pen in the pupil.
12.  Randomly stamp some of the small hearts in the main heart.
13.  Attach a ribbon to the back of the heart.

Hope you have a go at making this, it makes a lovely decoration. 

Bye for now
Maria x

Wednesday 5 February 2020

Sapphire Zen Lady

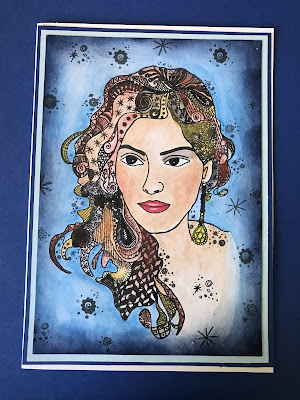
Hi everybody, hope you got chance to see Annelise and Alice on Hochanda at the end of January.  If you did and want to know a little more about how I made the Sapphire card, well here is how I made it.

Here is what you will need:
A4 stamping card
Copier paper
Sapphire Zen Lady stamp set from Colourific
Watercolour paints
Mid Blue Harmony ink pad by Spectrum Noir
Black Soot Distress ink
Versafine Onyx Black
Light blue card for Matting
Mid Blue Card for matting
A5 card blank

Here’s White I made this card
1. Using the Versafine ink pad, stamp the main image in the centre of an A5 piece of stamping card.
2.  Set the ink using a heat gun.
3.  Colour using watercolour paints.
4.  Stamp the image again on copier paper and cut out - this will be used as a mask.
5.  Blend the mid blue ink pad around the outside of the card - use the mask you have just used over your painted image to protect it from the blue.
6.  Blend the Black Soot distress ink around the outside of the card to give it depth. This helps draw the eye into the main image.
7.  Trim the card down by half a cm on each edge.
8.  There are a few small doodle stamps in the stamp set, I used these on the blue background mixing up the designs - I stamped them in Versafine.
9.  Mount onto the light blue card then onto the mid blue card.
10. Finally mount onto the A5 card base.

Want to change colours - I used the same principles on these two too - on the red one, instead of stamping the doodles onto the background, I sprinkled water into the red ink and blotted it off.


Why not try your own colour ways and post them in the Colourific Corner so that we can all see 😁

Bye for now
Maria
X

Tuesday 4 February 2020

Valentines Day Card 1

Hi everyone, Maria here with details of how I made my card for last weeks card.  I used 3 different stamp sets for this card and they are all available from the Colourific shop.

Here is a list of things you will need:
Love Wordage stamp set
Blossom Hearts stamp
Tiny Flower Background stamp
A4 stamping card
A5 card blank
Worn Lipstick Distress Ink
Tea Stain Distress Ink
Broken China Distress Ink
Glue
3D Foam pads

Here is how I made the card.

1.  Cut a piece of the stamping card to A5 size.  Using all three distress inks blend the colours in patches all over the card, overlapping in places.
2.  Stamp the Love Wordage stamp in different directions using the Worn Lipstick ink.
3.  Using the Tiny Flower Background stamp - just in your hand - no block, randomly stamp parts of the stamp in the spaces using a mixture of all 3 inks.
4.  On a separate piece of stamping card, stamp 2 Blossom Hearts using the Worn Lipstick ink and blend from the outside into the middle making it darker in the outside.
5.  Cut out the hearts leaving a small border.
6.  On another piece of stamping card, stamp the Love Wordage Stamp in Worn Lipstick and colour in using the same colour by stamping into a glass mat and picking up the ink with a paintbrush.
7.  Attach the two hearts to the background using foam pads - remembering to overlap at one side.
8.  Cut out the Love word leaving a small white border and glue into the two hearts.
9.  Stamp the sentiment from the Love Wordage stamp set, using the Worn Lipstick ink. Cut out and attach to the background using foam pads.
10. Attach to the A5 card blank using tacky glue.

There you go, a quick and easy Valentines Day card for that special someone in your life.

Keep checking back on the blog for more inspiration
Maria x

Friday 10 January 2020

Clink Clink, Cheers

Clink Clink, Cheers

Hi everyone, Maria here!  Need a card for an upcoming celebration?  Here is my Clink Clink Cheers card made using as couple of stamp sets from Colourific.

Here’s what you will need:

5x5” White card base 
4.2 x 4” Light Grey card
4 x3.7” White card
2.5 x 5” White card
A5 Rings stamp set from Colourific
Champagne and Cocktails stamp set from Colourific
Distress Ink Mermaid Lagoon
Distress Ink Tea Dye
Distress Ink Peacock Feathers
Stencil from stash
Versafine onyx black
Hearts washi tape (from the shop that sells things for £1)

Here us how to make the card

• Stamp the star ring onto the centre of the 4x3.7” white card stock in Marine lagoon distress Ink.

• Stamp one glass from the Champagne and Cocktails stamp set in Tea dye distress Ink, then mask the image and stamp another opposite and slightly on the mask.

• Colour partly with the Tea dye ink and stamp the sparkle dots just above the glasses in the same colour Ink.

• Stamp With Love from the Champagne and Cocktails set in Versafine.

• Mount onto the light grey square card

• Swish the 2.5x5” White card through some water spritzed Peacock feathers Distress Ink and dry with a heart gun.

• Mount the distressed Ink panel onto the left hand side of the card blank.

• Add Washi tape to the middle edge of the distressed panel.

• Attach the topper to the card base using 3D foam pads.

• To add a touch of sparkle i painted over the glasses using Spectrum Noir clear glitter Ink.

This is a very versatile card that can be customised to fit many celebrations, from Weddings, Engagements to exam congratulations. 

Watch out for my sneaky peek of the samples of the upcoming Hochanda Launch.

Friday 3 January 2020

Day tripper

Hi everyone - been a bit busy lately but I’m back on track now - here I have a Camper van card using a stamp from Colourific.

Materials used 

7 x 7” White card blank
6 x 6” White stamping card for background
4 x 4” Marine blue card
4.5 x 4.5” White card
3 3/4 x 3 3/4” Watercolour card
Camper van stamp
Versamark Smokey grey ink pad
Koh I Noor Watercolour paints
Catherine Pooler inks Aquatini & Tiara
Pearlywinks sprays Antique Teal Wink Vibes
Pearlywinks sprays Yellow Winx
Cosmic Shimmer Lunar Paste Stella Aqua
Double sided sticky tape
Foam pads
Marine blue and white card scraps
Happy Birthday stamp from my stash

• Stamp the Catherine Pooler inks into a glass mat and spritz with water. Swish the 6 x 6” white card through it. Thoroughly dry the card with a heat gun.
• Spritz the Pearlywinks inks onto the glass mat and swish the card through again. Dry the card.
• Drop spots of the Pearlywinks inks into the card and dry.
• Drop spots of water onto the card and dry.
• Smudge the edges with the Luna Paste and allow to dry naturally.
• Stamp the Camper van into the 3 3/4@ square card using the Versafine.
• Colour using the Koh I Noor watercolour paints. 
• Mount this onto the Marine Blue card with double sided tape and then mount onto the 4.5” square white card with foam pads.
• Once the inked background is dry, mount onto the card blank using the double sided tape.
• Mount the Camper van topper onto the inked background using double sided tape.
• Stamp a sentiment (I used a happy birthday one) into a scrap of white card and mount onto a piece of Marine Blue card then stick onto the card using foam pads.

Doxies Party

Here’s Doxies Party card made from the new stamp sets from Catherine Pooler Designs made for The Little Paper Tree Instahop. Stamped in the ...