Friday 29 November 2019

By the light of the silvery moon

Hi everyone Maria here, today I’m sharing my card I’ve named ‘By the light of the silvery moon’ and yes, I love Doris Day 😁. I used the A5 Houses stamp set from Colourific.
Here’s what I used:
A 6 card blank
Black card for mounting 
White stamping card
A5 Houses stamp set
Versafine Onyx Black
Coloured pencils
Watercolour ink brush pens (I used Spectrum Noir)
Kitchen roll
Adhesive
Double sided tape

Here’s what I did 
  1. Stamp and fussy cut out the small house, using the Versafine ink.
  2. Colour in using the coloured pencils (I drew in the curtains).
  3. Using the watercolour ink brushes, I added the blue to the top of a piece of stamping card and blended with a large flat brush and water - then I repeated with the amber colour and the green, making sure I blended the blue and amber colours for the sky but not the green.
  4. Dry this sheet using a heat gun or leave to dry naturally before you do the next step.
  5. Cut out a circle of card for the moon template - I used the top of an embossing powder lid to draw round.
  6. Place the moon template onto the sky - mainly into the blue section, and with a small wet paintbrush draw round the moon.
  7. Then with a medium sized brush wet the ink inside the circle and blot with kitchen roll - this brings the colour out of the moon giving it a faux bleached look.
  8. Glue the house onto the backing sheet.
  9. Mount onto white and then black card and then onto the card blank.

Hope you enjoy making this card.  Join me next Friday for more Colourific inspiration.
Maria x

Friday 22 November 2019

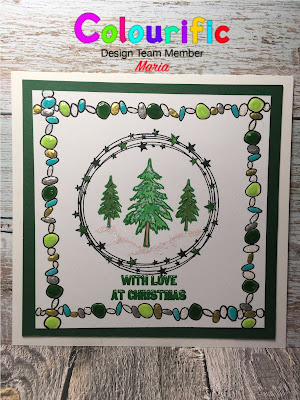
Evergreen

Hi, Maria here with my Friday post.  Today we have the Evergreen card which is made using 3 different Colourific stamp sets - Winter Wonderland, Beach Borders and A5 Rings.

Here’s what you will need-
6x6” Card Blank
5x5” White Stamping Card
5.5x5.5” Dark Green Card 
Winter Wonderland Stamp Set
Beach Border Stamps
A5 Rings Stamp Set
Black Versafine ink pad
Clear embossing powder
Tonic Nuvo Drops in Gold, Turquoise, Light Green, Dark Green, Silver
Clear sparkle Glitter Glue
Green Versafine
Watercolour paints

Here’s how I made it
  1. Using the 5.5x5.5” stamping card, stamp the Star Ring in the centre of the card using the Versafine black ink and emboss with the clear embossing powder.  Fill in the stars using green watercolour paint.
  2. Stamp a Medium Tree and two smaller trees, from the Winter Wonderland stamp set, into the middle of the Ring and colour in using the Watercolour paints.
  3. Using the green Versafine Ink, stamp and emboss the sentiment from the Winter Wonderland stamp set just under the ring.
  4. Now take the pebbles border from the border stamp set and stamp and emboss around the outside edges if the square.
  5. Using the Nuvo drops, randomly fill in the pebbles.
  6. Add some clear glitter glue to the trees and under the trees to ground them - to look like snow.
  7. Leave this to dry for a few hours to make sure all the Nuvo drops are dry.
  8. Mount onto the dark green card then adhere to the card blank.
There you go, all done, hope you like it.  Tune in next week for another card.
Maria x

Friday 15 November 2019

Celebrate your Special Day

Hello everyone, Maria here, for today’s card I’m bringing you a card using 2 sets of Colourific Stamps. I used the Celebrate Wordage stamp set and the A5 Champagne and Cocktails Stamp Set to make  this Special Day Card, but you can be more specific and make it an Anniversary/Wedding/Engagement/Birthday Card.
Here’s what you will need:

Celebrate Wordage Stamp Set
A5 Champagne and Cocktail Stamp Set
8x8 White Card blank
White Stamping card
Black card for mounting
Watercolour paints
Versafine
Distressed Oxides, peeled paint
Gold and silver Gel pens
Clear glitter glue
Double sided tape
3D Foam Pads

Here’s hope I made it.

  1. Using the black Versafine ink pad, stamp the Celebrate, Champagne bottle and two champagne flutes onto a piece of white stamping card.
  2. Colour in the bottle and the glasses using watercolour paints and fussy cut out.
  3. Colour in the word Celebrate using the silver and gold gel pens then cut this out leaving a 4cm border around the outside.
  4. To make the background, stamp the Peeled Paint Distress Oxide Stamp Pad onto a as blending mat and spritz with water.  Swish and swirl a piece of 7”x7” White Stamping Card through the ink. Dry with a heat gun and repeat the process until you reach the desired effect.
  5. Adhere the Celebrate, Champagne bottle and glasses onto the background using 3D Foam Pads.
  6. Using the ‘your Special Day’ Stamp, Ben’s and shape it on your stamping block to make the words wave, and using the black Versafine ink, stamp onto the background card.
  7. Mount onto the black card and onto the card blank.
  8. Finally, add some sparkle by adding spots of glitter glue to the Champagne Glasses and the stars around the word Celebrate.
I hope you enjoy making the card, why not try the different colour backgrounds or use your alcohol pens to colour. The main rule is, just play and have fun.

Maria x

Friday 1 November 2019

Bonfire Night

Hi everyone, November already! Where did the year go? I know it’s only the 1st of November but today I’m showing you my Bonfire Night card made using the A5 Houses set from Colourific.


Here is what you will need;
A5 Houses stamp from Colourific
Masking paper or fluid
Carnivale Colour burst powders - or Brusho powders
Black Stazon
White stamping card
Card to mount - I used Navy Blue

Here’s how to make it:


  1. Cut your white card to the size you want to make - mine is 6x6.
  2. Stamp two of the houses onto the card - you can choose any of the houses. Use black Stazon ink.
  3. Mask off the stamped houses.
  4. Lightly spritz the card with water and sprinkle the card with the Carnivale Colour Burst or brusho starting with blue at the top, then red and yellow then finally the green.  The colour will burst out when you sprinkle. You can add more water to disperse the inks until you get the desired look.
  5. Take off the masking and colour the houses with a mix of the Carnivale Colour burst or brusho inks.
  6. Leave it to dry naturally.
  7. Use a corresponding coloured card to mount up.
Hopefully you have a card resembling the vibrancy of Bonfire Night!  Now, I’m off to make some parkin and toffee apples. Enjoy!


Maria x

Doxies Party

Here’s Doxies Party card made from the new stamp sets from Catherine Pooler Designs made for The Little Paper Tree Instahop. Stamped in the ...