Monday, 28 June 2021

Weirdly Wonderful Ones and Pets

Fabulous new stamp collection by Stamptagious by Nicola Elliott

This collection is full of Weirdly Wonderful characters and their pets, they are just so quirky, you’ll love them. 
https://drive.google.com/uc?export=view&id=1YvFHJTaKuzJ9UY56TFNLInYX_BNJQxQ6

The stamp sets will be demonstrated on The Craft Store on Wednesday 30th June at 11am and 2pm on the Leonie Let’s Loose shows.

Hope you can join her there,I can’t wait to see what she makes with them.

In the meantime, why not join the Facebook group Stamptagious by Nicola Elliott to see more of the Design Team samples and checkout the Etsy site Etsy


Weirdly Wonderful Show Stamptagious by Nicola Elliott

Here we have one of the samples for the launch of a fantastic new set of stamps by Stamptagious by Nicola Elliott.
https://drive.google.com/uc?export=view&id=1DXgvCt9xJ2473OL07iN15a8pBQaSKh9J
These fabulous stamps will be demonstrated on the Leonie Let’s Loose shows on The Craft Store on Wednesday 30th June 2021 at 11am and 2pm.

Hope you can all join Leonie for the show so that you can see all the wonderful designs.

This card shows the Juggler and one of the Jesters, they are coloured in pencils and are on a spritzed only background.

Check out the Etsy store Stamptagious and the Facebook group Stamptagious by Nicola Elliott, where you will see more samples from the Design Team.

Hope to be seeing you there soon.
Maria


Tuesday, 16 February 2021

Chill with music

 Lockdown can be a really stressful time - I like to chill out in my craft room with my inks and paints - some like to listen to music - why not do both?


Here’s my Chill card made using one of Picket Fence Studios Beautiful Girls stamp and the Chill sentiment from Sunshine Bee Designs.

https://drive.google.com/uc?export=view&id=1LJsCHziFuJkgi-hJRHo9LUgOwzs0aIlR

I stamped the girl on a small piece of card using black onyx Versafine and coloured in with watercolours. I then fussy cut it out.


Using Distress Oxides I made 2 backgrounds, one in hickory smoke, the other in the denim blue.   


To give the background depth, I second generation stamped an old music score stamp out of my stash randomly on the blue background using Smokey Grey Versafine, randomly.


I cut this layer to fit nicely inside the grey background and applied silver Gilding wax around the outside, then mounted onto a black layer.


Next glue the Beautiful Girl onto the bottom Left corner.


Stamp the Chill stamp using Black Versafine onto the blue background.


Attach all the layers together and add to an A5 card blank.


All done - hope you enjoy using these techniques.


Bye for now

Maria 


Sunday, 1 March 2020

New home

Hi everyone, as promised here is the new home card I made this week.  I used the A6 Houses Stamp set from Colourific and used the masking technique to layer up the houses.


Here’s what you will need

White, yellow and turquoise card
7x7” card base
A5 Houses Stamp set
Versafine black ink pad
Colouring pencils - mine are Spectrum Noir
Sticky notes
Double sided tape or glue

Here’s how I made the card.

1.  Cut a piece of white card to 5.5 x 5.5”

2. Stamp 3 of the small houses using black Versafine.


3.  Stamp the house onto 4 pieces of sticky notes, making sure your stamp covers the sticky edge.

4.  Cut out all the sticky note houses.

5.  Cover the three houses on the white card with the sticky notes.

6.  Stamp the house again over the top of the sticky notes as shown in the picture.


7.  Peel off the sticky notes and use them again to cover the houses you have just stamped.

8.  Continue covering with notes and stamping until you completely fill the sheet.

9.  Colour in the houses - I used colour pencils but you can use whatever you want.

10.  Finally mount to onto the coloured card and the card base. 

11.  Add a sentiment to the bottom right corner if you wish.

I hope this is clear and you can understand what I’ve done - if not, just leave me a message in the corner and I’ll try and help you out.

Bye for now 

Maria x

Monday, 24 February 2020

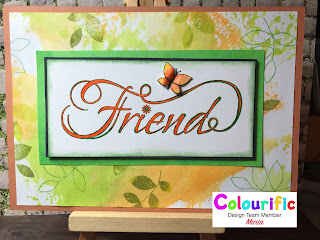
Friend

Hello everyone, Maria here with my step by step instructions on how I made the Friend card below

Here’s what you will need:

White stamping card
A5 Light Brown/tan card blank base
Black Card
Green card
Friend Wordage stamp by Colourific
A6 Leaves Stamp set by Coloyrific
Green Versafine Clare
lime green, sage green and light orange ink pads - I used Catherine Pooler Minis)
Glue/Double sided tape
Yellow and Orange Fineliners

Here’s how I made the card:

1.  Stamp the light orange and lime green ink pads onto a glass Matt or blending Matt, spritz with water and swoop the white stamping card through it until you get the desired effect.
2.  Dry the background sheet with a heat gun.
3.  Randomly stamp the leaves onto the background using the sage green ink pad.
4.  Using the green Versafine Clare inkpad, Stamp the word Friend onto a piece of white stamping card.  Cut down the card to frame the word.
5.  Colour the inside of the word Friend using the orange fineliner.
6.  Ink around the outside of the card using the lime green inkpad.
7.  Mat and layer into the black and green card.
8.  Mount the background sheet onto the tan card base and mount the topper into the background, cantering in the middle.
9.  Stamp the butterfly onto a separate piece of card and colour using the fineliners.
10.  Bend back the wings and glue the middle of the butterfly above the ‘e & n’ of the word friend.

Hope you enjoy making your card and that your friend likes it too.  Keep your eyes on the blog for more ideas and inspiration using the Colourific stamp sets. 
Mariax


Girl Gnomes - Beach Days Download images

My card for the Last Minute Manda May Challenge Blog is this lovely seaside card with a couple of the gnomes from the Beach Days download im...