Showing posts with label Distress Oxides. Show all posts

Monday, 28 June 2021

Weirdly Wonderful Ones and Pets

Fabulous new stamp collection by Stamptagious by Nicola Elliott

This collection is full of Weirdly Wonderful characters and their pets, they are just so quirky, you’ll love them. 
https://drive.google.com/uc?export=view&id=1YvFHJTaKuzJ9UY56TFNLInYX_BNJQxQ6

The stamp sets will be demonstrated on The Craft Store on Wednesday 30th June at 11am and 2pm on the Leonie Let’s Loose shows.

Hope you can join her there,I can’t wait to see what she makes with them.

In the meantime, why not join the Facebook group Stamptagious by Nicola Elliott to see more of the Design Team samples and checkout the Etsy site Etsy


Tuesday, 16 February 2021

Chill with music

 Lockdown can be a really stressful time - I like to chill out in my craft room with my inks and paints - some like to listen to music - why not do both?


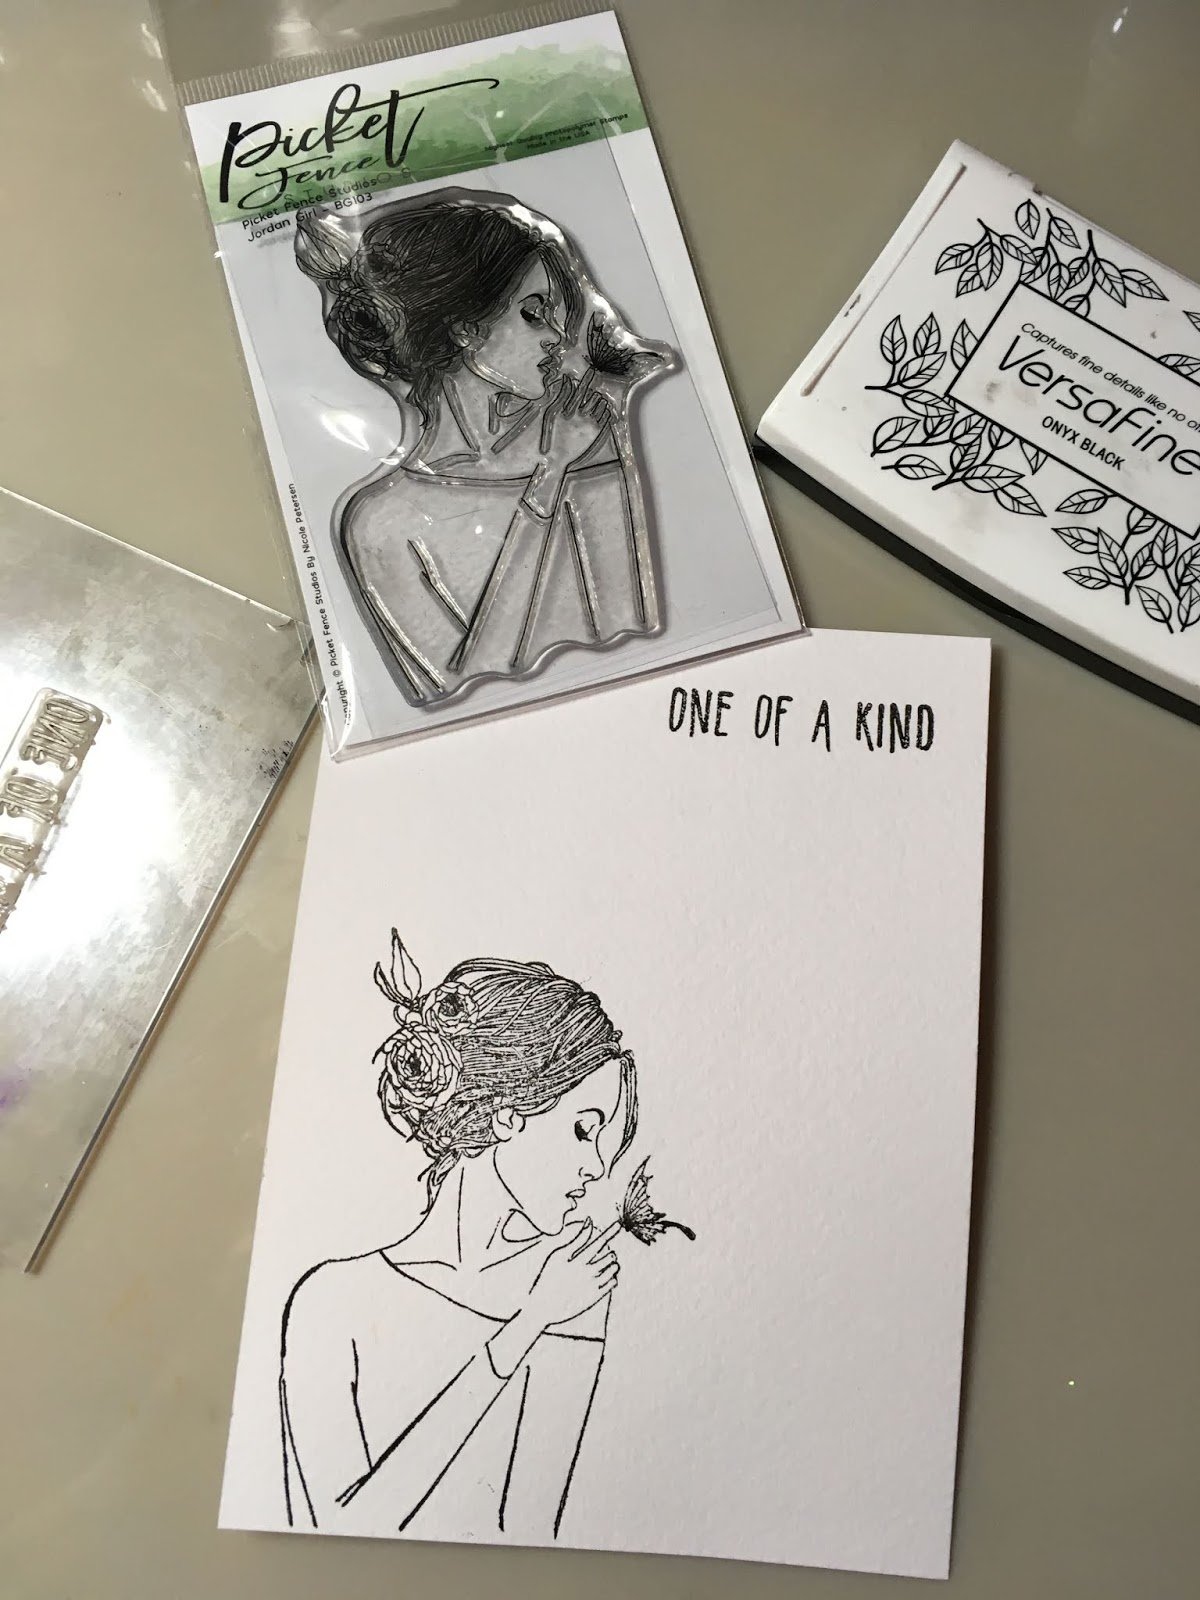
Here’s my Chill card made using one of Picket Fence Studios Beautiful Girls stamp and the Chill sentiment from Sunshine Bee Designs.

https://drive.google.com/uc?export=view&id=1LJsCHziFuJkgi-hJRHo9LUgOwzs0aIlR

I stamped the girl on a small piece of card using black onyx Versafine and coloured in with watercolours. I then fussy cut it out.


Using Distress Oxides I made 2 backgrounds, one in hickory smoke, the other in the denim blue.   


To give the background depth, I second generation stamped an old music score stamp out of my stash randomly on the blue background using Smokey Grey Versafine, randomly.


I cut this layer to fit nicely inside the grey background and applied silver Gilding wax around the outside, then mounted onto a black layer.


Next glue the Beautiful Girl onto the bottom Left corner.


Stamp the Chill stamp using Black Versafine onto the blue background.


Attach all the layers together and add to an A5 card blank.


All done - hope you enjoy using these techniques.


Bye for now

Maria 


Wednesday, 7 August 2019

Too Darn Hot

Hi everybody, what a hot week we had last week, the weather inspired me to make this cardhttps://drive.google.com/uc?export=view&id=1FUUlKBm9c0WTp72VFqgb49EP2nHBoYTv
I used distress oxides squeezed lemonade and fired brick to make a background and stencils and stamps from Bee Crafty. 

The main image is a stamp from Bee Crafty’s Fashionista range. 

Competition entered

Tuesday, 6 August 2019

Live Life

Hi everybody,

This weeks card is called Live Life, this card features a stamp set from Visible Image called Tomorrow Doesn't Exist.

This stamp is available from The Little Paper Tree Shop - just follow the link.  Don't forget to use discount code gail10 for 10% off your order.

Here's what you will need:

A4 White Stamping Card
Distress Oxide Inks - Peacock Feathers, Picked Raspberry
Distress Ink - Salty Ocean, Black Soot
Spectrum Noir Harmony ink Midnight (dark blue)
Versafine - Onyx Black
Versamark
Ranger White Embossing Powder
White Gesso
3D Foam
Sequins
Black Card for mounting
A5 Card Blank

Here's how I made it:
  1. Stamped the Distress Oxides and the Salty Ocean Distress Ink onto a blending mat, spritzed it with water and swooshed the stamping card through it until you are happy with the effect.
  2. Dry thoroughly with a heat gun.
  3. Stamp the main image with Versamark and emboss with White Embossing Powder.
  4. Add a bit of water to the White Gesso and splash all over the topper.  Let this dry.
  5. Blend the edges firstly with the Dark Blue ink then the Black Soot Distress Ink.
  6. Stamp the words onto a separate piece of white card, cut out and stick to the card using 3D Foam pads. 
  7. Attach the odd sequin randomly.
  8. Mount onto black card before attaching to the A5 card blank.
Hope you enjoy making my card.  If so, let me know.

Bye for now - more on Friday.
Maria


Friday, 2 August 2019

Believe

Happy Friday everybody, I've used the Colourific A5 Hibiscus stamp to make this lovely card.
If you like my card and want to make one like it, here is what you will need:

A5 Hibiscus stamp from Colourific
White watercolour card
Distress Oxide inks in Candied Apple, Twisted Citron, Weathered Wood, Twisted Lemonade
Catherine Pooler Minis set - Life of the party - Lime Rickey, Tiara, Tutti Frutti
PVA Glue
Dark red card
3d Foam Pads
Coloured pencils, I have Faber-Castell Polychromos
Pink Nuvo Pearl drops
8 x 8 card blank

Here is what I did:

  1. Use the Distress Oxides to make a splodgy background by stamping on a blending mat, adding water and swishing a piece of card through, just smaller than the 8x8" card blank.  Dry with heat gun.
  2. On a smaller piece of watercolour card, wet it with water and stamp the inked up solid flower stamp (I used the medium one) by using the Catherine Pooler Inks, yellow in the middle and red on the outside.  Spritz with water again until the inks all blend together - then dry with heat gun.
  3. Stamp the large solid flower and the swirls onto a separate piece of water coloured card and cut out leaving a small border.
  4. Use a red coloured pencil to colour the inside part of the flower head.
  5. Use a sentiment stamp from your stash and stamp onto a separate piece of card and again, cut it out.
  6. Mount up the cut out images onto the smaller piece of background card using the glue for the flower stems and 3D foam pads for the blossoms.
  7. Add small dots of the Nuvo Pearl Drops to the inside of the flower and let it dry.
  8. Mount this topper onto a piece of dark red card which is cut out slightly larger to give a darker border.
  9. Mount this on an angle onto the Distressed Oxide background, then attach it to an 8 x 8" card Blank.
  10. Finally add the sentiment on a piece of 3D foam.
There you have it, all done.  Don't forget to clean up through the background inking process, it can be quite messy, but that where the fun is!

Hope you enjoy making this card, if you do leave me a message and tell your friends.

Bye for now
Maria

Monday, 22 July 2019

Hola Llama

Hola Llama,


Sometimes it’s just nice to say Hola I’ve given the Llama a lovely bright background - reminds me of holidays.

I used the Catherine Pooler minis to create this background, just by blending all the bright colours onto a piece of card and randomly stamping the Hola stamp from the No Problama stamp set and blended the orange colour around the outside.


The Llama was stamped in Versamark and embossed in clear embossing powders, I used Distress Oxides (Vintage  Photo and Fossilized Amber) I also stamped the little flower for her hair.

On a separate sheet of card I Stamped the Hola stamp 3 times and cut out. I went round the border of the rectangles in the same inks as the background and 3D mounted them onto the card. I finished the card by mounting onto a light blue background and adding a few gems.


All the items used can be bought from The Little Paper Tree, just follow the link, and don’t forget to use my discount code:  gail10 at the checkout.

Have fun
Hola!

Monday, 8 July 2019

Jordan, one of a kind

Good morning everyone, and welcome to my very first blog for The Little Paper Tree.  
This is my card, step by step instructions of how I made it will follow.  Please feel free to comment and ask questions at the end of the blog.


What you will need - 
Black card 5.5" x 7.25"
Honey Bees No Problama stamp set for the sentiment
Distress Oxides (I used Fossilised Amber, Fired Brick and Vintage Photo)
Light Grey Nuvo marker
Nuvo Crystal Drops Repened Pumpkin and Dandelion Yellow
Paper cutter, Water spritzer, stamping block, blending mat or glass mat, paintbrush, 
You will find the items for sale at The Little Paper Tree
https:\\thelittlepapertree.com\  Use the discount code gail10 for 10% off your order.

Here is what I did:
Take the 4.5 x 6" watercolour card and stamp the Jordan Girl and Sentiment using Versafine Onyx Black ink.


Stamp a small amount of the Distress Oxides onto your blending mat and use the ink to paint the image.


Outline the Jordan Girl image with a light grey Nuvo Marker.


Stamp the Fossilised Amber and Fired Brick Distress Oxides on your mat again, this time using more ink, then spritz with water.  Swipe, swish and dab the 5 x 6.5" watercolour paper through the ink.


Dry naturally or using a heat tool.  Mount the background onto the black card then onto the A5 card blank


Adhere the topper to the card and add the Nuvo Crystal Drops.


To finish the card off, I used the Nuvo Crystal Glaze to enhance the flower and butterfly.


And there you go, all done!  Don't forget to let the crystal drops and glaze dry thoroughly before touching!

I hope you enjoyed this step by step tutorial - don't forget to use the discount code gail10 when ordering your products from The Little Paper Tree.  If you like the images and want to see more, why not join our Facebook group, The Little Paper Treehouse Tribe. #shopthelittlepapertree #thelittlepapertreeuk

Bye for now
Maria

Girl Gnomes - Beach Days Download images

My card for the Last Minute Manda May Challenge Blog is this lovely seaside card with a couple of the gnomes from the Beach Days download im...